2012年1月27日金曜日

First nuke python

nukeのpython初めて書いてみました。
ヘルプが大分使いづらいので、googleで検索した方が答えに近いです。
pythonの良いところは日本でも3DCG以外の人もユーザーが多く、すぐに調べ物が見つかります。


選択したReadノードの連番の桁数を調べるスクリプト。

import os.path
fp = nuke.selectedNode()['file'].getValue()
root, ext = os.path.splitext(fp)
print ext
print root
print len(ext)
fileName = root[1: (len(root)-4)]
print fileName
Keta =int( root[(len(root)-3) : len(root)-1])
print Keta
----------------------------------------------------------------------------------

nukkeファイルのあるディレクトリを開くスクリプト。

import os

nukeFile = nuke.root().name()
nukeDir = os.path.dirname(nukeFile)
print nukeDir
unc_path = nukeDir.replace( "/", "\\" )
en = 'explorer'+' '+unc_path
print en

os.system(en)

2012年1月14日土曜日

scriptのすすめ10 ~変数と配列~ maxscript tips

This time I will explain about variable and array.
Probably this post is boaring but they are very necessary to understand every script language and to construct complicate script.
I've never explain them because I'd like to write this tips for artists and I'd like to make scripts easy to introduce.
Actuarlly we already use varialbe before now.

For instance, "b=box(), rc = random 0 255 ,myP = point(),m= standardmaterial() and i= 1"

b,rc,myP,m,i are variable.
I make the analogy of other thing,it`s like a case which is set in one object.
you can put anything (e.g. box(),point(),number...)into cases and you can access the content of a case by using the variable.

On the ohter hand,I think array is like an extended version of variable.I will introduce two exsamples.

myArray =#(a,5,9,"text",100)
a = #($Teapot001,box(),9,standardmaterial())


Array is like a locker with number label,you can also anything into lockers and you can access the each contents by using array`s name and label number.
For instance,the way to access 2nd value of myArray is myArray[2] which return 5 and a[1] is $Teapot01.
Position value (e.g. [2,4,3]) called point3 one of kinds of array.
Besides "selection" is one of kinds of array.Both contents can be access by label number as well.

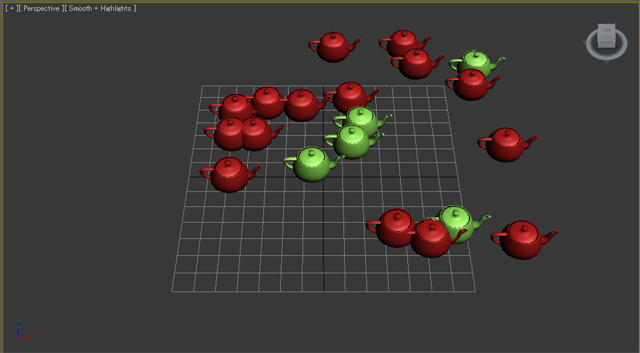
So let`s make a align tool.
First I'll prepare several objects are orderd randamly.
As I showed before,I use for loop and random function.
------------------------------------------------------------------------------------------------------------------------------------------------
for i = 1 to 20 do
(
    rx = random -50 100
    ry = random -50 100
    t = teapot radius:10
    t.pos = [rx,ry,0]
)

------------------------------------------------------------------------------------------------------------------------------------------------

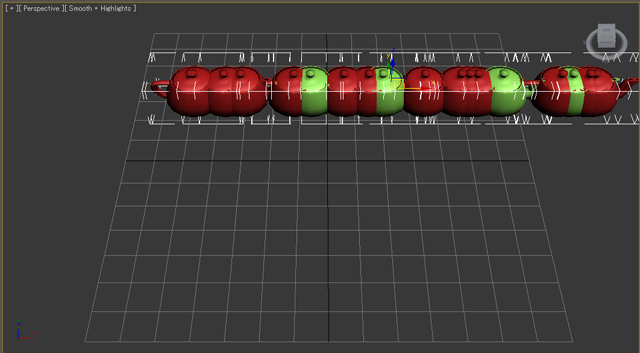
So, let`s line up selected objects on their avelage positon of Y axis.
------------------------------------------------------------------------------------------------------------------------------------------------
total=0 --prepare a variable to keep to add Y position value of all objects.
for o in selection do
(
    total= total+o.pos[2] --As I explain before, first "total" is result of "total+o.pos[2]"
)
--o.pos[2] means Y position value of each seleted object.
--First resut of this for-loop becomes 0+o.pos[2] ,2nd result becames "1st result+o.pos[2]", So, one after another "o.pos[2]" is added in "total" variable.

avelage = total/selection.count --you can get array's number of elements by using ".count".
--divide total value by number of selected objects.

for o in selection do
(
    o.pos.y= avelage -- assign the avelage value to Y position of selected objects.
)

------------------------------------------------------------------------------------------------------------------------------------------------

I wrote this script with comments after "--" is comment which is not evaluate so you can just paste this script on maxscript editor.

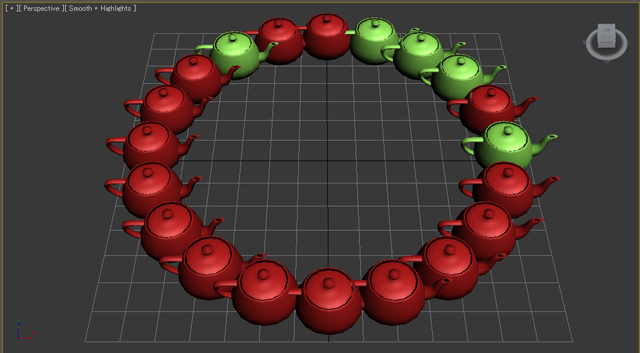
Finally, you have to need a bit mathmatic knowledge,
let's try to line up selected objects on a circle.
We use trigonometric function.

------------------------------------------------------------------------------------------------------------------------------------------------
oc = selection.count
i = 0
for o in selection do
(
    i = i+1
    o.pos.x=sin(i*360/oc)*60
    o.pos.y=cos(i*360/oc)*60
)

------------------------------------------------------------------------------------------------------------------------------------------------

Next time I will revise this script for modeling.
so see you then! next time!

------------------------------------------------------------------------------------------------------------------------------------------------
今回は、変数と配列について説明しようと思います。
おそらく、ひどく退屈な記事になりそうですが、変数と配列はどのスクリプト言語にとっても必要な要素で複雑なスクリプトを書くには通らねばならぬ道となります。
今まで説明してこなかったのは、デザイナー・アーティスト向けのTipsとして導入しやすくしたい気持ちがあったのです。

変数は実はもう今までに散々使っていて、例えば

"b=box(), rc = random 0 255 ,myP = point(),m= standardmaterial(),i= 1"

のb,rc,myP,m,i などは全て変数です。
変数を他のもので例えるならば、1つ物を入れる事の出来るケースの様なものです。ケースには何でも入れることが出来、boxでもpointでも数でも入れる事が出来ます。そして中に入れたものにはその変数を使ってアクセスできます。

一方、配列は変数の拡張版の様なものです。まずは、2つの例をお見せします。

myArray =#(a,5,9,"text",100)
a = #($Teapot001,box(),9,standardmaterial())


配列はラベルナンバー付きのロッカーの様なもので、同様にどんな物でも入れられ、中身には配列の名前とナンバーを使ってアクセスできます。

例えば、myArrayの2番目の値にアクセスするにはmyArray[2] と書き、5の値が返ってきます。
a[1]は$Teapot01です。(シーンにTeapot01という名前のオブジェクトが無いとエラーになります。)
ポジションの値(例、[2,4,3])なども、配列の一種でpoint3など呼ばれています。
さらに、selectionも配列の一つです。共にラベルナンバーを使って中身にアクセスできます。

では、整列ツールを作ってみましょう。
最初に、いくつかのオブジェクトをランダムに並べてみましょう。
以前紹介した様に、for ループとrandomメソッドを使います。
------------------------------------------------------------------------------------------------------------------------------------------------
for i = 1 to 20 do
(
    rx = random -50 100
    ry = random -50 100
    t = teapot radius:10
    t.pos = [rx,ry,0]
)

------------------------------------------------------------------------------------------------------------------------------------------------

では、選択したオブジェクト達のY軸の平均値に一列に整列させてみましょう。
------------------------------------------------------------------------------------------------------------------------------------------------
total=0 --最初にそれぞれのYポジションの値を足し算していく為の変数totalを用意します。
for o in selection do
(
    total= total+o.pos[2] --以前説明した様に、最初のtotalはtotal+o.pos[2]の結果です。
)
--o.pos[2]は選択オブジェクト1つ1つのYポジションの値です。
--なので、このforループの1回目の結果は"0(ゼロ)+o.pos[2]" で、2回目の結果は"01回目の結果+o.pos[2]"となり、次々にそれぞれのYポジションの値がtotalという変数に足されていきます。
avelage = total/selection.count -- ".count"を使って、配列に幾つオブジェクトが入っているか値を得ることが出来ます。
--totalの数を選択オブジェクトの数で割ることで、平均値が求めれれます。

for o in selection do
(
    o.pos.y= avelage --平均値をYポジションに割り当てます。
)

------------------------------------------------------------------------------------------------------------------------------------------------

コメント付きでスクリプトを書きました。 "--" より後ろは評価されませんので、そのままスクリプトエディタに貼り付けてもO.Kです。

最後に、少し数学の知識が必要ですが選択オブジェクトを円形に並べてみようと思います。三角関数を使います。

------------------------------------------------------------------------------------------------------------------------------------------------
oc = selection.count
i = 0
for o in selection do
(
    i = i+1
    o.pos.x=sin(i*360/oc)*60
    o.pos.y=cos(i*360/oc)*60
)

------------------------------------------------------------------------------------------------------------------------------------------------

次回はこれを拡張してモデリングに応用してみようと思います。
それでは、また!!


2012年1月9日月曜日

2012年心に刻む格言

失敗したからって、それがどうしたというのだ。

Houdini POPs Breaking System (with 2nd and 3rd fracturing)

http://vimeo.com/34260583

HoudiniのPopsで2次破壊3次破壊をコントロールするシステムを作ってみました。
DOPsに自動で衝突時に破片を作ってくれるノードもあるのですが、重い、プラス衝突時のみの
機能なので、条件を設定する事が出来ません。
破片の形状をボロノイ拡張した仕組みにしたので、Houdiniならではのディールを持てる
仕組みに出来たと思います。

2012年1月3日火曜日

謹賀新年

明けましておめでとうございます。
さて、あっという間に1年が経っちゃいました。

色々振り返ると、去年は色々身の回りの環境が変わった年で、
意識はなかったけれど、少し守りに入ってしまったような気もします。
悪い癖で、何か行動する前に考え過ぎてしまって行動が鈍るとこもあります。
今年は積極的に、まずは行動出来たらと思います。

そういえば、昨年知った大前研一さんの名言があります。

人間が変わる方法は3つしかない。
1番目は時間配分を変える。
2番目は住む場所を変える。
3番目はつきあう人を変える。

この3つの要素でしか人間は変わらない。
最も無意味なのは『決意を新たにする』ことだ。


3つの方法は、なるほど便利だなと思い、上手く利用出来たらとも思いますが、
決意も継続は力なりで意識して行動すれば、自分を変える事も可能だと思います。

最近深く心に刻んでいる事があって、
どのジャンルでも一流の人は人並み外れた努力しているという事、
そして自分を信じている事。

この業界に10年以上いて、天才と思った人は3人いましたが、皆どこかで努力していて、
そして迷いが無い人達でした。

自分もその方々に近づけるよう、今年も自分を信じてやっていこうと思います。

本年もよろしくお願いします!

2011年12月14日水曜日

scriptのすすめ9 ~if文、spinner、radio button~ maxscript tips

日本語Ver張り忘れていました。。

Before I revise last code, I will show you how to use "if" and "else".
Here is a simple example.

a = 1
if a == 1 then
(
    print "a is one"
)
else
(
    print "a is not one"
)

--------------------------------------------------------------------------------------------------------------------------------------
when we want to separate some actions,we use if and else.
if you change "a = 1" to "a = 5","a is not one" will be printed on lisner.
So,this time I'll show you how to use "Spinner" and "radioButtons".

First let's make a radio button to choose geometry.
Here is an example.


rollout myUI "simpleUI"
(
    radiobuttons rb_type labels:#( "Box","Sphere","Teapot")
    spinner spn_size "Size:" range:[0, 10000, 25]

    button myBtn "Do!!" width:200 height:50
  
    on myBtn pressed do
    (
        if rb_type.state == 1 do
        (
            b = box length:spn_size.value  width:spn_size.value height:spn_size.value
        )
        if rb_type.state == 2 do
        (
            b = sphere radius:(spn_size.value/2)
        )
        if rb_type.state == 3 do
        (
            b = teapot radius:(spn_size.value/2)
        )
      
        for i = 1 to 10 do
        (
            for j =1 to 10 do
            (
                for k=1 to 10 do
                (
                    ib = instance b
                    ib.pos = [i,j,k]*spn_size.value
                )
            ) 
         
        )
        delete b
    )
)
createdialog myUI  240 100

--------------------------------------------------------------------------------------------------------------------------------------
I added 2 UI parts and modify some code.
First one is a radio button.

radiobuttons rb_type labels:#( "Box","Sphere","Teapot")

"rad_type" is the radio button's name whitch is used for access its state.
if you choose "Box", it will return 1, if you choose "Sphere", it will return 2,if you choose "Teapot"it will return 3.
We can access the number by using ".state".
radio buttons is for just returning a number whitch button is selected.

spinner spn_size "Size:" range:[0, 10000, 25]

"spn_size" is the spineer"s name whitch is used for access its value is the same as radio buttons.
spineer needs 3 numbers,in this case,"0" is minimum value of this spinner,"10000" is maximum value and 25 is default value.
We can access the spinner's value by using  ".value".

Lastly let's add spinners to control how many objects is created along the each axis.


--------------------------------------------------------------------------------------------------------------------------------------
rollout myUI "simpleUI"
(
    radiobuttons rb_type labels:#( "Box","Sphere","Teapot")
    spinner spn_size "Size:" range:[0, 10000, 25]
  
    spinner spn_x "X:" type:#integer range:[1, 10000, 10]
    spinner spn_y "Y:" type:#integer range:[1, 10000, 10]
    spinner spn_z "Z:" type:#integer range:[1, 10000, 10]
  
    button myBtn "Do!!" width:200 height:50
  
    on myBtn pressed do
    (
        if rb_type.state == 1 do
        (
            b = box length:spn_size.value  width:spn_size.value height:spn_size.value
        )
        if rb_type.state == 2 do
        (
            b = sphere radius:(spn_size.value/2)
        )
        if rb_type.state == 3 do
        (
            b = teapot radius:(spn_size.value/2)
        )
      
        for i = 1 to spn_x.value do
        (
            for j =1 to spn_y.value do
            (
                for k=1 to spn_z.value do
                (
                    ib = instance b
                    ib.pos = [i,j,k]*spn_size.value
                )
            ) 
         
        )
        delete b
    )
)
createdialog myUI  240 170

--------------------------------------------------------------------------------------------------------------------------------------
That's it this time.
See you then, next time!!
Thank you.
--------------------------------------------------------------------------------------------------------------------------------------
前回のコードを拡張していく前に、if文elseの使い方を説明しておこうと思います。
こちら、簡単な例です。

a = 1
if a == 1 then
(
    print "a is one"
)
else
(
    print "a is not one"
)

--------------------------------------------------------------------------------------------------------------------------------------

a が1のときは、a is one それ以外のときは,"a is not one"とプリントされます。
何かの条件で分岐したいときに使うというだけです。
試しにa=1 をa = 5に変えてみると、,"a is not one"とプリントされると思います。

では、ここからはスピナーとラジオボタンの使い方を説明しようと思います。
まずは、ジオメトリを選ぶ為のラジオボタンを作ってみようと思います。
例です。


rollout myUI "simpleUI"
(
    radiobuttons rb_type labels:#( "Box","Sphere","Teapot")
    spinner spn_size "Size:" range:[0, 10000, 25]

    button myBtn "Do!!" width:200 height:50
  
    on myBtn pressed do
    (
        if rb_type.state == 1 do
        (
            b = box length:spn_size.value  width:spn_size.value height:spn_size.value
        )
        if rb_type.state == 2 do
        (
            b = sphere radius:(spn_size.value/2)
        )
        if rb_type.state == 3 do
        (
            b = teapot radius:(spn_size.value/2)
        )
      
        for i = 1 to 10 do
        (
            for j =1 to 10 do
            (
                for k=1 to 10 do
                (
                    ib = instance b
                    ib.pos = [i,j,k]*spn_size.value
                )
            ) 
         
        )
        delete b
    )
)
createdialog myUI  240 100


--------------------------------------------------------------------------------------------------------------------------------------
2つのUIと少しコードを足してみました。
1つ目はラジオボタンです。

radiobuttons rb_type labels:#( "Box","Sphere","Teapot")

"rad_type" はこのラジオボタンの名前でどの状態にあるか取得する為に使います。
 "Box"を選択していれば1を返し、"Sphere"なら 2、"Teapot"なら3の値を返します。
".state"を使って、このラジオボタンにアクセスできます。
ラジオボタンはただどのボタンが選択されているか、ということをナンバーで返すものです。

spinner spn_size "Size:" range:[0, 10000, 25]

"spn_size" はこのスピナの名まで、ラジオボタン同様値を得る為に使います。
"0"は最小値"10000"最大値で 25はデフォルトの値です。
スピナの値には".value"を使ってアクセスできます。

最後に、軸それぞれに幾つオブジェクトを並べるか決めるスピナーを追加してみましょう。


--------------------------------------------------------------------------------------------------------------------------------------
rollout myUI "simpleUI"
(
    radiobuttons rb_type labels:#( "Box","Sphere","Teapot")
    spinner spn_size "Size:" range:[0, 10000, 25]
  
    spinner spn_x "X:" type:#integer range:[1, 10000, 10]
    spinner spn_y "Y:" type:#integer range:[1, 10000, 10]
    spinner spn_z "Z:" type:#integer range:[1, 10000, 10]
  
    button myBtn "Do!!" width:200 height:50
  
    on myBtn pressed do
    (
        if rb_type.state == 1 do
        (
            b = box length:spn_size.value  width:spn_size.value height:spn_size.value
        )
        if rb_type.state == 2 do
        (
            b = sphere radius:(spn_size.value/2)
        )
        if rb_type.state == 3 do
        (
            b = teapot radius:(spn_size.value/2)
        )
      
        for i = 1 to spn_x.value do
        (
            for j =1 to spn_y.value do
            (
                for k=1 to spn_z.value do
                (
                    ib = instance b
                    ib.pos = [i,j,k]*spn_size.value
                )
            ) 
         
        )
        delete b
    )
)
createdialog myUI  240 170

--------------------------------------------------------------------------------------------------------------------------------------
今回は以上です。
ではでは、また次回。

2011年11月29日火曜日

The Smurfs making

スマーフのメイキング。とても良い感じです。 キャラの作りこみ、アニメーション、シェーダー、ライティングどれもいい感じですねー

2011年11月28日月曜日

Reel Luca Zappala 2011

http://vimeo.com/31275216
爆発・煙系のFXアーティストでは今まで一番凄いです。埋め込みが出来ないのでリンクです。
必見!